-
follow me
-
-
subscribe via email
-
-
hello

-
Welcome! Im Julie and I love classic, cozy living, homemade pie, down-home cooking, organized spaces and hunting for treasures. I enjoy sharing my love of all things home with you!
-
Search this blog
-
-


-
Download the FREE App!

-
Kitchen Remodel

-
Simple Valentine’s Day Craft

-
Valentines Day Flowers

-
Simple Valentine’s Day Gift

-
Valentine’s Day

-
Simple Spring Decor Idea

-
Easy Spring Door Decor

-
Simple Spring Craft

-
Simmering Potpourri

-
bulk storage solution

-
Top Posts & Pages
-
-
Follow me on Pinterest!
Visit Lilacs & Longhorns's profile on Pinterest. -
Find me on Facebook
Find me on Facebook
Tag Archives: front door decor
How to Make a Gorgeous Fall Wreath for Less
The other day I saw a fall wreath that was priced at $400. Yes, four HUNDRED dollars!
I didn’t take a picture of it because it wasn’t all that pretty.
But, it did encourage me to haul myself on over to the craft store to create a beautiful new door wreath for a whole lot less!
As a result, I’m going to show you how to make a gorgeous fall wreath for a fraction of the pre-made wreath price.

This wreath cost me around $45 to make. It’s still not particularly cheap, but given the price of pre-made wreaths (even those from craft stores) it’s a bargain!
It is large, too. I have a very big front door and this fills it nicely.
Are you inspired to make one for yourself?
Tutorial
Materials:
- grapevine wreath
- miscellaneous faux fall foliage and berries (I like to buy more than I think I’ll need so I don’t run out — you can always return unused items)
- plastic pumpkins and gourds
- pine cones
- hot glue gun, glue sticks
- wire cutter
Directions:
- Using a wire cutter, clip the faux foliage in to about 5-7 segments or “hunks”
- Lay the segments on top of the wreath where you think you want to place them
- Continue clipping segments and placing them here and there on the wreath
- When you’re satisfied with the overall look of the wreath, begin hot gluing the pieces of foliage in to place. I like to shove them in between the grapevine branches and glue them in place so they stay secure — particularly if it is an outdoor wreath
- After the foliage is glued in place I do the berries next. After that, the pumpkins, gourds and pine cones.
When everything is in place, hold it up vertically (because you’re probably doing this on a flat surface like a table and it will look a little different once you hold it up) and determine if there are any holes or any places that need to be filled in. I tweak and fuss until it looks just right. Then it’s ready to enjoy!
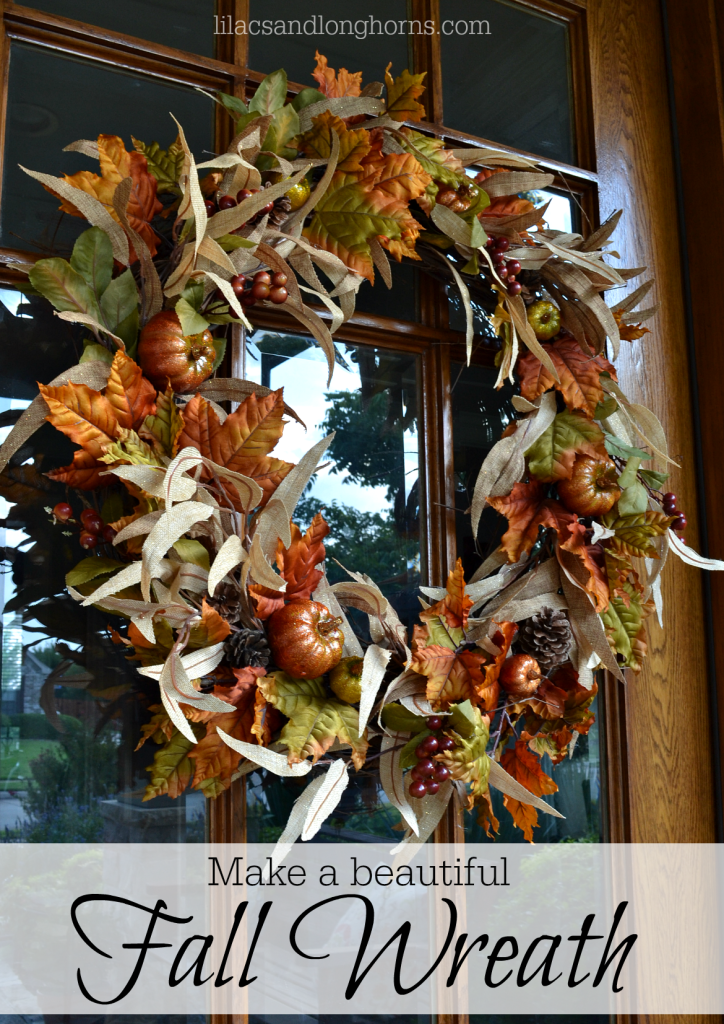
This wreath took me about 30-45 minutes and I just love how it turned out. It was easy to make and makes a big statement on my front door.
How did I keep my costs down? First, making it yourself almost always costs less than pre-made. Second, I am a big fan of coupons. Craft stores like Hobby Lobby, JoAnn Fabrics and Michaels almost always have sales and coupons. (I have their apps on my phone so I always have a coupon with me when shopping.) Here’s another tip…shop at Walmart. I found my pumpkins and gourds there and they were much cheaper than at the craft store. The Dollar Store is a great place for seasonal items too.
I love this wreath and now I’m motivated to decorate the rest of my front porch. Bring on Fall!
***
Before I go, I want to tell you about an upcoming event that you won’t want to miss.
Next week on Saturday, September 20, I am joining 20+ bloggers to host a Best of DIY link party!

We will each share a project that is farmhouse, vintage, re-purposed, Shabby Chic and/or DIY. In addition, you’ll be able to link yours up too. If you’re a blogger, this means your link will be seen on 20+ blogs. If you’re a reader, you will see TONS of DIY inspiration! More details to come.
Have a great day everyone!

Sharing at: The Scoop Savvy Southern Style
Share on facebook | Share on Twitter | Pin on Pinterest

