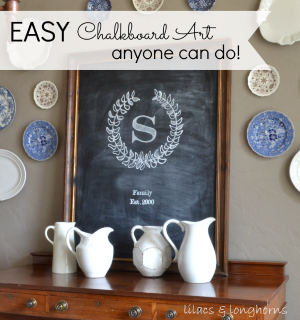
When I made my large chalkboard that resides in my dining room I was really excited about the prospect of changing out the artwork on it from season to season.

But, on my first attempt to write something on it, I got kind of intimidated.
What in the heck was I going to write to fill up all that space? And, even scarier, how was I going to make it look good?
Aack!
I do admit that I’m pretty good at copying some typography and simple art free-hand, but I am no artist, that’s for sure.
So, when I stumbled upon this transfer method awhile back, I was thrilled! It really does make it easy to do chalkboard art and lettering yourself.

Don’t think you can?
You can!!
The directions below are for making the monogram art I made above, but the transfer method can be used to make any chalkboard art for any occasion.
Supplies:
- computer print-out of words/art you want to transfer on to your chalkboard
- piece of chalk
- pencil
- chalkboard ink pen (optional)
- Round disc, like a platter or plate
Step 1:
Use your computer to print out a letter and any other words you want to include on the board. Be sure to make it big enough for the size of your chalkboard plus consider the size of the leafy wreath in which you want to place/center the letter.
Step 2:
I placed the platter upside down on the board where I wanted to wreath. Then, I outlined it about 80% of the way around — using my chalk ink pen — leaving a little gap at the top so it’s not a full-circle wreath.

Step 3:
I began adding some leaves to the circle — this I did free-hand. I promise, this is not hard! Draw the shape of an orange wedge or apple slice — they do not have to be perfect and they don’t all have to look the same!

Also, they will probably look wrong to you as you’re going along. hang in there, it will look good when you’re all done. Plus, it’s chalk — it’s totally erasable!
Step 4:
When you’re done with the leaves (by the way, you don’t need to fully embellish them at this point) get your print-out of your monogram and rub chalk on the BACK of the paper directly behind the monogram.

Step 5:
Turn the paper over so the chalk side is on the board. Carefully center it and then trace the letter with a pencil. You don’t have to fill it in, just trace an outline. Press firmly so the chalk on the back of the paper transfers on to the chalkboard.
Step 6:
Remove the paper and you’ll see a faint outline of your image. Use a chalk pen or regular chalk to trace over the image and then fill in as desired.

Step 7:
Finish your wreath leaves. I went over my first outlines and added a few berries. I also randomly shaded in a few leaves to give them some extra depth. I found that I liked using the chalk ink pen best for the outlines and the real chalk for shading and filling in.

Fyi…I edited out my last name for this blog post for privacy sake, but if you’re doing this piece you would add your own so it would read something like: “The Smith Family, Est. 2000.”

And, that’s all there is to it! Easy, right?
I love how this board turned out!
Thanks so much for reading and have a great day!

Sharing at:
Savvy Southern Style








Looks easy and beautiful! Thanks for the great tutorial!
So that’s your secret! I’m so glad to know this because when I try to do it free handed it’s never very pretty.
I meant to tell you the other day when you showed your chalk pens…be careful! They don’t always wash off very well.
How cool! I’ve been wondering how you make your chalkboard look so awesome. Where do you find the chalk pen? Michaels, Hobby Lobby? In the art section or craft paint?
Pinning this!
So pretty…thanks for sharing!! You are so creative!
Great tutorial…I love your chalkboards!
Hi Julie, I had this post pinned and just copied what you did…LOVE IT …… I will blog about it myself sometime this weekend and make sure to include your link in my post…Christine from Little Brags